Gimme A Brake: Common Rim Brake Problems and How to Solve Them
by Charlie LaNoue
For cycling enthusiasts, riding a bike brings to mind images of peace and tranquility. However, all of that can come to a screeching halt when experiencing issues with your brakes. Although we agree it's more fun to speed up than to slow down, the latter is vital! Whether your brakes are squealing when engaging, rubbing when untouched, or not slowing you down fast enough, it is worth taking a full stop to troubleshoot the matter.
What are V-brakes
Before dealing with these common issues, it helps to understand how they work. There are various types of braking systems for bikes, with coaster, cantilever, disc, and V-brakes being the most common. All woom GO bikes come equipped with V-brakes, and all woom EXPLORE, woom NOW, and woom OFF and OFF AIR models come with disc brakes. To learn more about adjusting disc brakes, check out our blog.
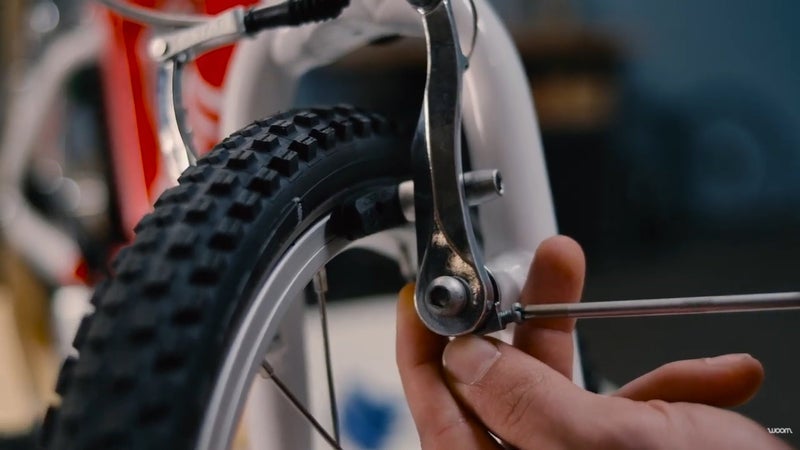
In the most basic terms, V-brakes consist of two levers attached to your bike’s handlebars that engage the front and rear brakes via two cables. Pull the lever, and it pulls the cable, which in turn actuates the brake, causing the corresponding brake pads to squeeze your bike’s rims, ultimately slowing down your bike.
Also known as linear-pull or direct-pull brakes, V-brakes are mounted to your frame via brake bosses, consisting of two brake arms, cable housing attached to one arm, and the cable itself to the other arm. When the cable pulls against the housing, the arms (and brake pads) are drawn together.
Brake Pads not Engaging
If you’re tugging on the brake lever and find it isn’t resulting in the brake pads effectively contacting the rim surface, you probably have extra slack in your brake cable. This is caused by a few different factors and is most commonly experienced when assembling the bike or replacing a tube or tire.
The end of the brake cable has a small disc-shaped piece that fits into the brake lever securely to connect the lever to the cable. Sometimes during assembly or changing a tire, the cable will come completely loose from the lever. Luckily this is a fairly straightforward fix. If the lever is indeed connected properly with the cable, there may be another source of the slack.
Lack of tension in the brake cable may also be caused by your brake “noodle” not being properly seated in the brake channel. This will lead to extra slack in the brake cable, which renders the brake pads unable to engage when the lever is pulled. To close the brake system, the tip of the brake noodle will need to be seated firmly in the channel of the brake arm.
Brake Squeal: Causes and Fixes
Hearing a squealing sound is arguably the most common issue with V-brakes. Typically, brake squealing is an indication of contamination or vibration. The first thing you want to do when your V-brakes start making noise is make sure your rims and brake pads are clean and free of debris. Often, the cause of contamination is over-enthusiastic use of chain lube or gunk build-up from riding on dirty, oily, or wet road conditions. Use a bike-specific degreaser to remove oil residue from the rims.
The brake pads themselves can also be the source of the problem. Glazing, embedded grit, and uneven wear are all potential culprits. Brake pads may become hardened and smooth (i.e. glazed) by over-application or through extreme heat and no longer provide enough friction to slow you down effectively.
Use a small pick to extract any foreign objects and employ fine-grit sandpaper directly on the pads to de-glaze the top layer. If you notice uneven wear on the brake pads, this is likely an indication of improper installation. Most pads must be inserted in a specific direction, usually indicated by an arrow printed on the pad.
If a good cleaning doesn’t solve your noise problems, then vibration due to misaligned brake orientation is likely the issue. This is typically caused when your brake pads don’t touch the rims correctly. While brake pads are usually installed so that they are parallel to your bike’s rims, it’s often best (and quietest) if the front of the pad touches the rim first, also known as “toeing in” the brakes.
To toe-in your brakes, start by opening the brake system. Release the brake cable from the lever to loosen the brake and create some working space between the pad and the rim. Next, insert a thin piece of cardboard behind the back end of the pad to create space between the pad and rim. Then close the brake system by reinstalling the brake cable and firmly engage the hand brake lever. Next, loosen the bolt that holds the brake pad in place and move the pad around until it’s properly aligned with the rim, then retighten the bolt. Finally, remove your cardboard spacer and again engage the brake lever, checking to make sure the front of the brake pad touches the rim first.
Last but not least, check to ensure that all bolts securing the various brake parts are snugly tightened. If anything is loose, it can cause unwanted brake noise. It is also important to acknowledge that brake pads are consumable items that need to be replaced when worn. Most pads have a wear indicator that will tell you when it’s time for a new set (our brake pads have“teeth” that will no longer be visible).
Brake Rub: Causes and Fixes
The second most common V-brake issue is brake rub, which simply means your brake pads are touching your rims when you don’t want them to. Besides slowing you down, brake rub can result in premature pad wear and even damage your rims.
To address this problem, start by making sure all the various components are properly installed. Something as simple as a misaligned wheel can cause major problems but is easy to fix.

A misaligned wheel will appear to “wobble” as it rotates around its axle if viewed from a side profile. To address this, simply loosen the quick release, make sure the axle is properly seated in the drop-outs, and then re-tighten the quick release. This assures that the wheel is centered and will often solve your brake rub issue. Next, give your wheel a spin and look for any wobbling or side-to-side movement of the rim.
If the wheel still appears to wobble despite being securely positioned in the drop-outs, it may be “out of true” and require some professional assistance to get the wheel trued. Services like Velofix and other at-home servicing providers can easily assist you with any problems without you ever having to leave your home. In the example shown in this video, you can see that even though the wheel is centered in the drop-outs, it still has wobble. This wheel is out of true.
Finally, make sure that your brake properly releases when you release the brake lever. If the pad is sticking or there’s a delay, it can be an indication of brake cable friction. If that’s the case, it’s probably time to get a new brake cable and housing installed.
Another cause of delay is loose, broken, or missing brake arm springs. On most V-brakes, there’s a spring that extends up the inside of the brake arm. If the brake arms spring back unevenly, one of the arm’s pads can drag against your rim, causing rub. Usually you can fix this by adjusting spring tension via a small screw located on the side of one or both brake arms. Experiment by turning the screw(s) in or out until tension is equal on both sides.