Troubleshooting Bicycle Disc Brakes
Kiddos love woom bikes for so many reasons — Lightweight! Amazing colors! Built especially for young Riders! The list goes on. But one feature they don’t talk about very much? Brakes. For such a crucial safety component, we often take brakes for granted. While hiccups with brakes on woom bikes are few and far between, the occasional issue might arise. And we’re here to help point you in the right direction for troubleshooting your Rider’s brakes, specifically bicycle disc brakes.
There are two primary types of brakes on bicycles. Rim brakes (featured on all woom ORIGINAL bikes) are less expensive, easier to maintain at home, and a bit lighter. Disc brakes, on the other hand, offer unwavering performance even in wet, muddy, or sloppy conditions. This is where disc brakes really shine; when your Rider is spending time twisting and turning on trails, they’ll be able to reduce speed drastically in a split-second.
It should come as no surprise that nearly all modern mountain bikes now come equipped with disc brakes, including the woom OFF & woom OFF AIR, woom UP, and woom NOW (not a mountain bike but intended for daily urban riding in all weather). Increasing braking power increases the Rider's confidence when tackling tough conditions, no matter if the terrain or the weather creates them.
Bicycle Disc Brakes 101
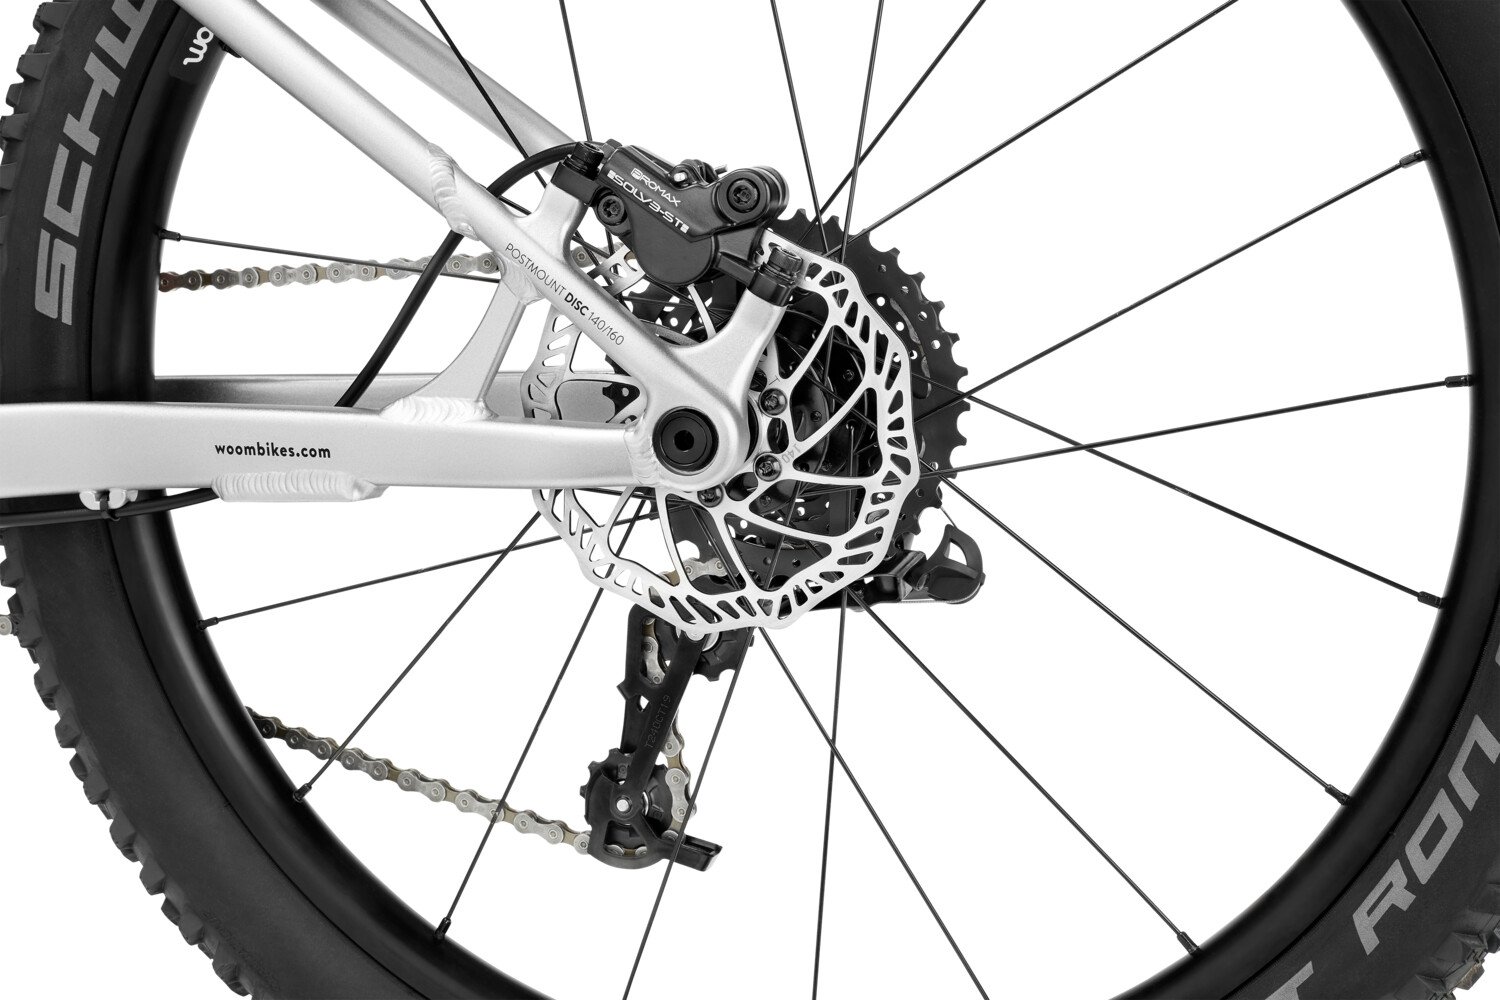
Before we pedal into problem-solving, let’s explore brake basics. Both rim brakes and disc brakes use friction applied from brake pads to slow down the bike. While rim brakes simply apply force directly to the wheel’s rim, disc brakes work by applying pressure to a rotor (the disc) mounted around the wheel’s hub.
Disc brakes first came into the cycling world as a lightweight, thinner adaptation to an existing motorcycle braking system. There are two main types of disc brake systems, mechanical and hydraulic, and the key difference is how they transmit force from the brake levers (on the handlebar) to the brake caliper (on the disc). While mechanical disc brakes are cable-actuated (like rim brakes), hydraulic disc brakes use pressurized fluid to engage the brake.
Hydraulic disc brakes offer superior modulation, are very responsive and easy to regulate, require less daily maintenance, and provide more overall stopping power. All the things you want for your kiddo’s bike, right? That’s why woom OFF, woom OFF AIR, woom UP, and woom NOW are all equipped with hydraulic disc brakes.
woom Riders have little hands, so having maximum braking power that requires minimal grip strength is quite beneficial. When your Rider pulls a hydraulic disc brake lever, brake fluid (woom’s disc brakes use mineral oil) gets pushed into the brake line, which is already full of fluid and sealed. This creates a build-up of pressure and, in turn, causes the pistons to move the disc brake calipers, which forces friction on the brake pads against the rotor, ultimately resulting in your Rider slowing down! Every time your Rider hits the brakes, it’s a miniature Magic Moment.
Troubleshooting Tips for your woom’s Disc Brakes
Issue: Squealing Disc Brakes on Brand New Bike
Right out of the box, after assembling your new woom bike, you might notice those disc brakes make an awful squeal at first or don’t feel as powerful as advertised. Fear not – there’s an easy solution – you just need to bed in your brakes!
Solution: Bedding in New Disc Brake Pads
“Bedding in” is just an industry term that means “breaking in.” Just like you’d break in new running shoes before a 5K, brakes on a new bike need to be broken in, too. When you “bed in” the brake pads, it levels them out so they are perfectly flush with the rotors, which transfers more brake pad material to the rotor in the process.
- Have your kiddo ride at a moderate speed back and forth, such as on a driveway or up and down the sidewalk past a few houses.
- Next, have them squeeze the brake several times to slow down — not to completely come to a stop, just gently enough to slow down to a walking pace. By not clamping down completely on the brake, the material on the brake pads is evenly applied to the rotors, which is the most important part of this process.
- Repeat this 8-10 times. The squealing noise will gradually vanish!
Issue: Rotor is Rubbing on the Brake Pad(s)
When a rotor is rubbing, it has a way of making itself known. Your Rider will usually either feel a drag as they pedal or hear an annoying scraping noise with each pedal stroke. Unlike our previous issue, this one is a little trickier to diagnose, and the approach toward finding a solution will depend on the diagnosis. We created a list of possible solutions; as you read through the following, choose the one that best describes your situation.
Solution: Reset the Pistons
Did you recently purchase and assemble the bike and find the rotor instantly and constantly rubbing against the brake pads? You may need to reset the pistons by pushing them apart. As a reminder, the pistons are housed inside the caliper, are affixed with disc brake pads, and are pushed toward the rotor by the hydraulic line when you squeeze the levers. This issue usually occurs because the brake lever was (accidentally or unwittingly) squeezed before installing the wheel.
- Pro tip: Never pull a disc brake lever with the wheel off! If you do so, the pistons will overextend themselves since they have no rotor to limit their movement.
- To resolve this, you’ll need to remove the brake pads and use a narrow tool (such as a flathead screwdriver) to push the pistons back apart.
Solution: Ensure the Wheel is Aligned in the Dropout
Next up on your checklist: make sure the wheels are correctly aligned in the dropouts (the slots in the back of the bike frame and bottom of the fork that secure the axles of the wheels). Although wheel misalignment is more likely to happen with quick-release axles, this can also happen with thru-axles. Of course, if the wheel is slightly askew, this will result in the parallel rotor not being centered within the caliper.
- Untighten the axle lever.
- Reposition the wheel:
- For quick-release axles (on woom NOW bikes), you will be able to remove the wheel without fully removing the axle. Lift the wheel out and reposition it snugly in the dropout slots.
- For thru-axles (on woom OFF, woom OFF AIR, and woom UP), you’ll need to fully remove the thru-axle from the dropout hole. Ensure the wheel is lined up with the dropout hole, and then re-insert the thru-axle carefully, ensuring the threads screw in correctly.
- Fully tighten and close the axle lever. If not tightened fully, this may lead to further wheel misalignment.
Solution: Reposition the Caliper
If your rotor is slightly contacting the brake pad (but only during a small part of the overall rotor rotation), then you may need to reposition the caliper a wee bit.
- Loosen the caliper bolts, then adjust the caliper slightly to the left or right to ensure the rotor is equidistant between the brake pads.
- Lastly, tighten those caliper bolts. If you have a torque wrench, tighten the caliper bolts to 5Nm.
Solution: Check the Rotor and Wheel for Play
Did your kiddo ride the bike remarkably hard or take a tough tumble?
- Simply check the rotor – does it wiggle? It shouldn’t!
- Next, try rocking the wheel side to side and see if there is any bearing play in the hub. If there is, you’ve identified the issue! If not, we can move along.
Solution: True or Replace the Rotor
Rotors can become warped or bent from hard riding, overheating, or improperly leaning the bike against a hard surface over time. If none of the above diagnostics identified the issue, there’s a good chance the rotor itself is bent.
- Rotors, like bicycle wheels, can be “trued” or straightened out with the proper tools.
- But at a certain point, a rotor might need replacement.
- Notify our CX team if this is the case, and we can supply the original rotor for your specific model.
Solution: Clean the Pistons
If the pistons have excess dirt or grime, they may be “sticky” and not quickly return to their position after the brake is engaged. If you notice the rotor rubbing right after your Rider pulled and then released the brake lever, this is likely due to sticky pistons. Note that we typically recommend taking the bike to a professional mechanic for this job.
- First, you’ll have to remove the disc brake pads to access the pistons.
- Then, carefully engage the brakes to cause the pistons to protrude from their recess in the caliper.
- Next, use a cotton swab dipped in mineral oil to rid the pistons of the gunk.
- Be aware – if you pull the brake lever too far and the piston comes out of its cavity, you’ll get fluid everywhere!
Issue: Checking Disc Brake Pads
Disc brake pads generally last longer than rim brake pads. But, like all good things, they eventually come to an end. In the case of cable-actuated brakes (i.e. rim brakes or mechanical disc brakes), you can easily tell when the brake pads are getting worn down because you have to squeeze the brake lever further in. However, with a hydraulic disc brake system like woom’s, this isn’t the case. On hydraulic disc brakes, as the disc brake pads wear down, the pressurized hydraulic fluid simply pushes the pads further out by the pistons. In other words, you won’t be able to tell the brake pads are approaching the end of their life just on “feels” alone.
Solution: Visual Inspection, Penny Trick
So, how can you tell when you need new disc brake pads with hydraulic systems? To maintain quality braking performance on your child’s woom bike, you’ll want to visually inspect your Rider’s disc brake pads from time to time.
- The best way to do this is by removing the wheel, since you’ll be able to see more of the brake pad material with the rotor out of the way.
- If less than 1.5 mm remains (about the width of a penny), it’s a good idea to replace the pads to keep your kiddo safely rolling!
Issue: How to Replace Disc Brake Pads
Luckily, replacing the disc brake pads is fairly straightforward once you have the correct pads (contact our CX team for the exact model replacement pads).
Solution: Order the Correct Replacement Pads, Swap ‘Em Out!
Check out our handy video for an overview of this process.
- First, remove the wheel, and remember not to pull the brake lever with the wheel out!
- Use some pliers to remove the split pin, then push the brake pads out from the bottom of the caliper. The brake pads are in place by a small metal spring.
- Next, you’ll push the pistons back into the caliper with a narrow tool (such as a tire lever) to make room for the extra width of the new brake pads before proceeding.
- Lastly, replace with new disc brake pads and reverse the process – putting the new split pin back in, bending it back to hold the pads in place, and putting our wheel and axle back.
- Be sure to avoid getting any residue or oil on the new brake pads! Now your Rider is ready to hit the road again.
Issue: Leaking Hydraulic Fluid
If you notice any hydraulic fluid leaking along the brake line, whether near the lever or the caliper, it’s best to stop and locate the source of the leak if possible. When a bike loses fluid in a hydraulic system, the bike will lose braking power, and you’ll need to top off those mineral oils. Proceed to the solution below on bleeding the brake line.
Issue: Brakes Feel “Spongy” or Squishy
If your Rider is getting a “squishy” feeling when squeezing the brake lever or has to pull further back on the brake lever to get the same braking power, the bike most likely needs a brake bleed. This means there is some excess air in the hydraulic line, which has a way of working itself into the system over time. Casual Riders may be able to go several years before needing a brake bleed, but more ambitious Riders may need to bleed the brake line once every six months.
Solution: Bleed the Brake Line
First off, we recommend most customers take their bikes to a professional mechanic for a brake bleed, which generally runs around $40 to $50. However, if you’re handy or inclined to learn, you can knock out this task in your garage if you have the correct brake bleed kit and tools. Once again, it’s essential to remember that woom hydraulic disc brakes all use mineral oil as the brake fluid (don’t use DOT brake fluid, otherwise, you will ruin the brake line and seals!).
There are two main reasons to have your hydraulic brake line bled – removing air bubbles from the brake fluid, or entirely replacing the older contaminated brake fluid – both of which improve braking performance.
- To do a brake bleed, you’ll open a small “bleed valve” (covered by a dust cap) on the brake caliper and a bleed port in the brake lever.
- Next, you’ll connect these two ports with several syringes and hoses before carefully ridding the hydraulic line of air bubbles and/or replacing the brake fluid.
These steps here are an oversimplification; please watch this tutorial video for bleeding Promax hydraulic disc brakes here for a more detailed guide.
We're Here to Help - Full Stop.
If you have questions about your hydraulic disc brakes, we would be happy to hear from you. Our customer service team is dedicated to reducing your headaches and ensuring your child has a fantastic, fully dialed-in bike to ride. Contact us via email, phone, or chat for a quick answer, or set up a virtual consultation with one of our technical experts for more in-depth troubleshooting. If there’s something stopping your child from properly stopping their bike, we’re here to put it to a stop!