Parent's Guide: Simple woom Bike Tune-Up & Maintenance at Home
by Charlie LaNoue
Summary: Keeping your child's woom bike in top shape is easier than you think and crucial for their safety and riding fun! Whether it's been stored away or is fresh out of the box, a regular home bike tune-up ensures every ride is smooth and secure. This guide walks you through essential woom bike maintenance: dialing in the perfect fit, performing quick safety checks, tackling flat tires, and basic cleaning. Everything you need to keep your little rider rolling happily.
In this article:
- Dialing in the Fit for Safety and Comfort
- The Essential ABCD Pre-Ride Check
- Tackling Tires: Preventing and Fixing Flats
- Tips for Preventing Flats
- Determining the Cause of a Flat
- Step-by-Step: Replacing a Bike Tube
- Pro Tip: Always Carry a Flat Kit
- Keeping It Clean: Regular Bike Washing
- Frequently Asked Questions (FAQs)
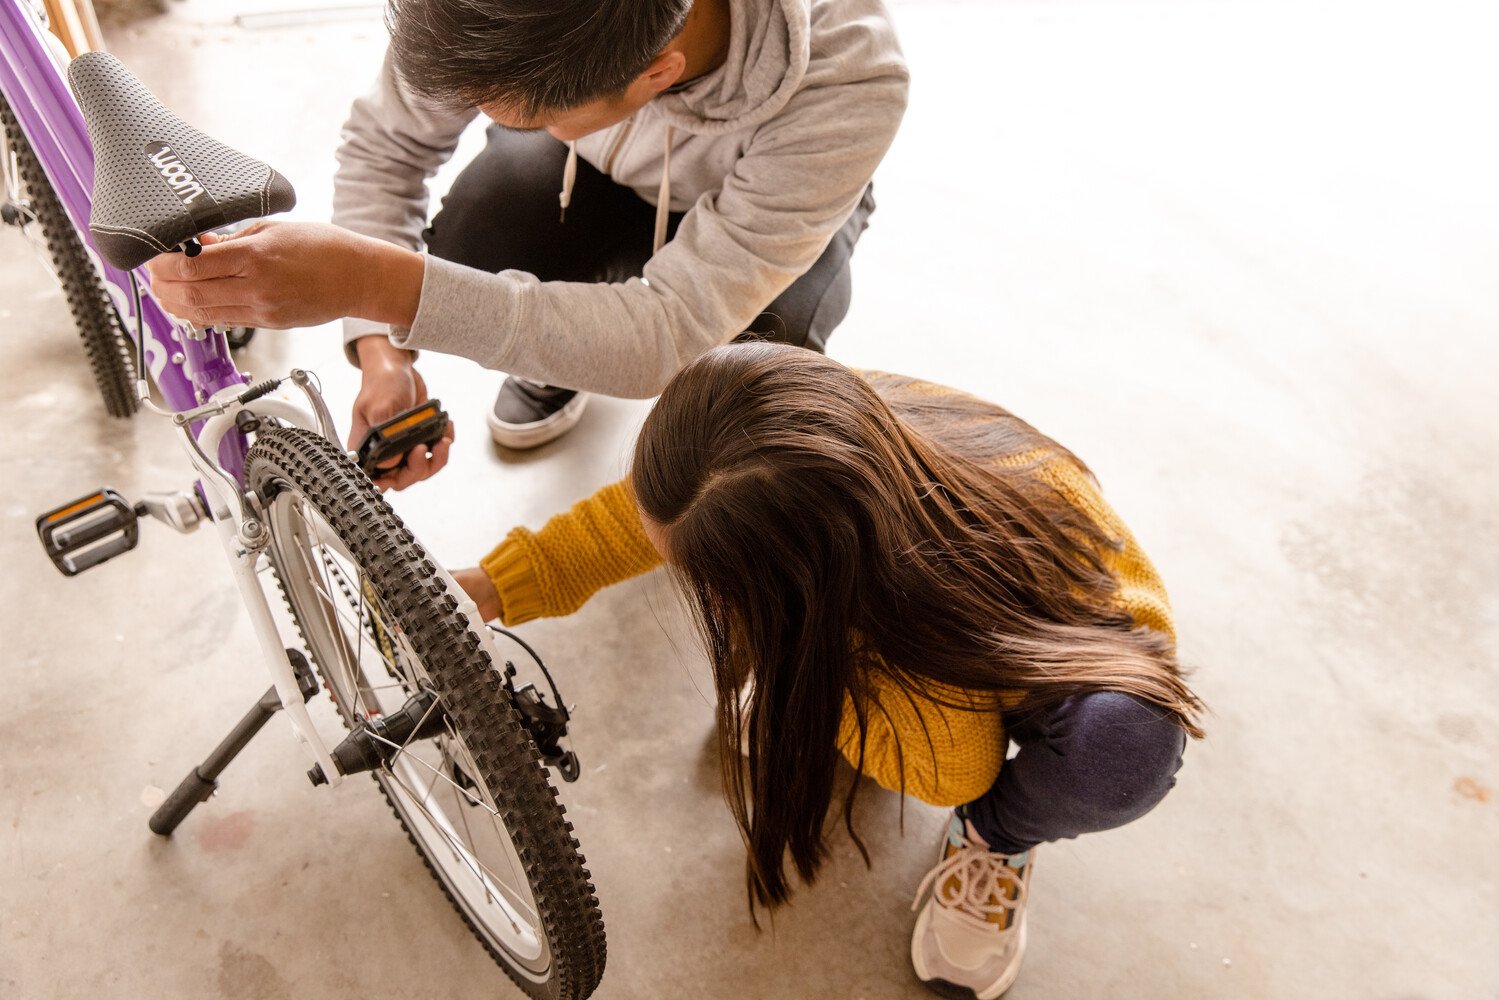
Dialing in the Fit for Safety and Comfort
First things first in any kids' bike tune-up: you’ll want to adjust the “fit” of your child’s bike. This is vital for their safety, comfort, and overall riding performance. A quick test ride around the block can immediately reveal if you need to make any changes, especially for a growing Rider. Getting the bike set up correctly for your kid is one of the easiest and most crucial parts of proper home bike maintenance. (For more details on specific adjustments for growth, see our article: Maximize Your Miles: The Ultimate Guide to Adjusting Your woom Bike as Your Child Grows).
The Essential ABCD Pre-Ride Check
A quick bike tune-up at home can be as easy as ABCD! Before every ride, give your child’s woom bike (and your own bike!) a quick “ABCD” check. This simple bike safety check ensures the most critical components are in good order:
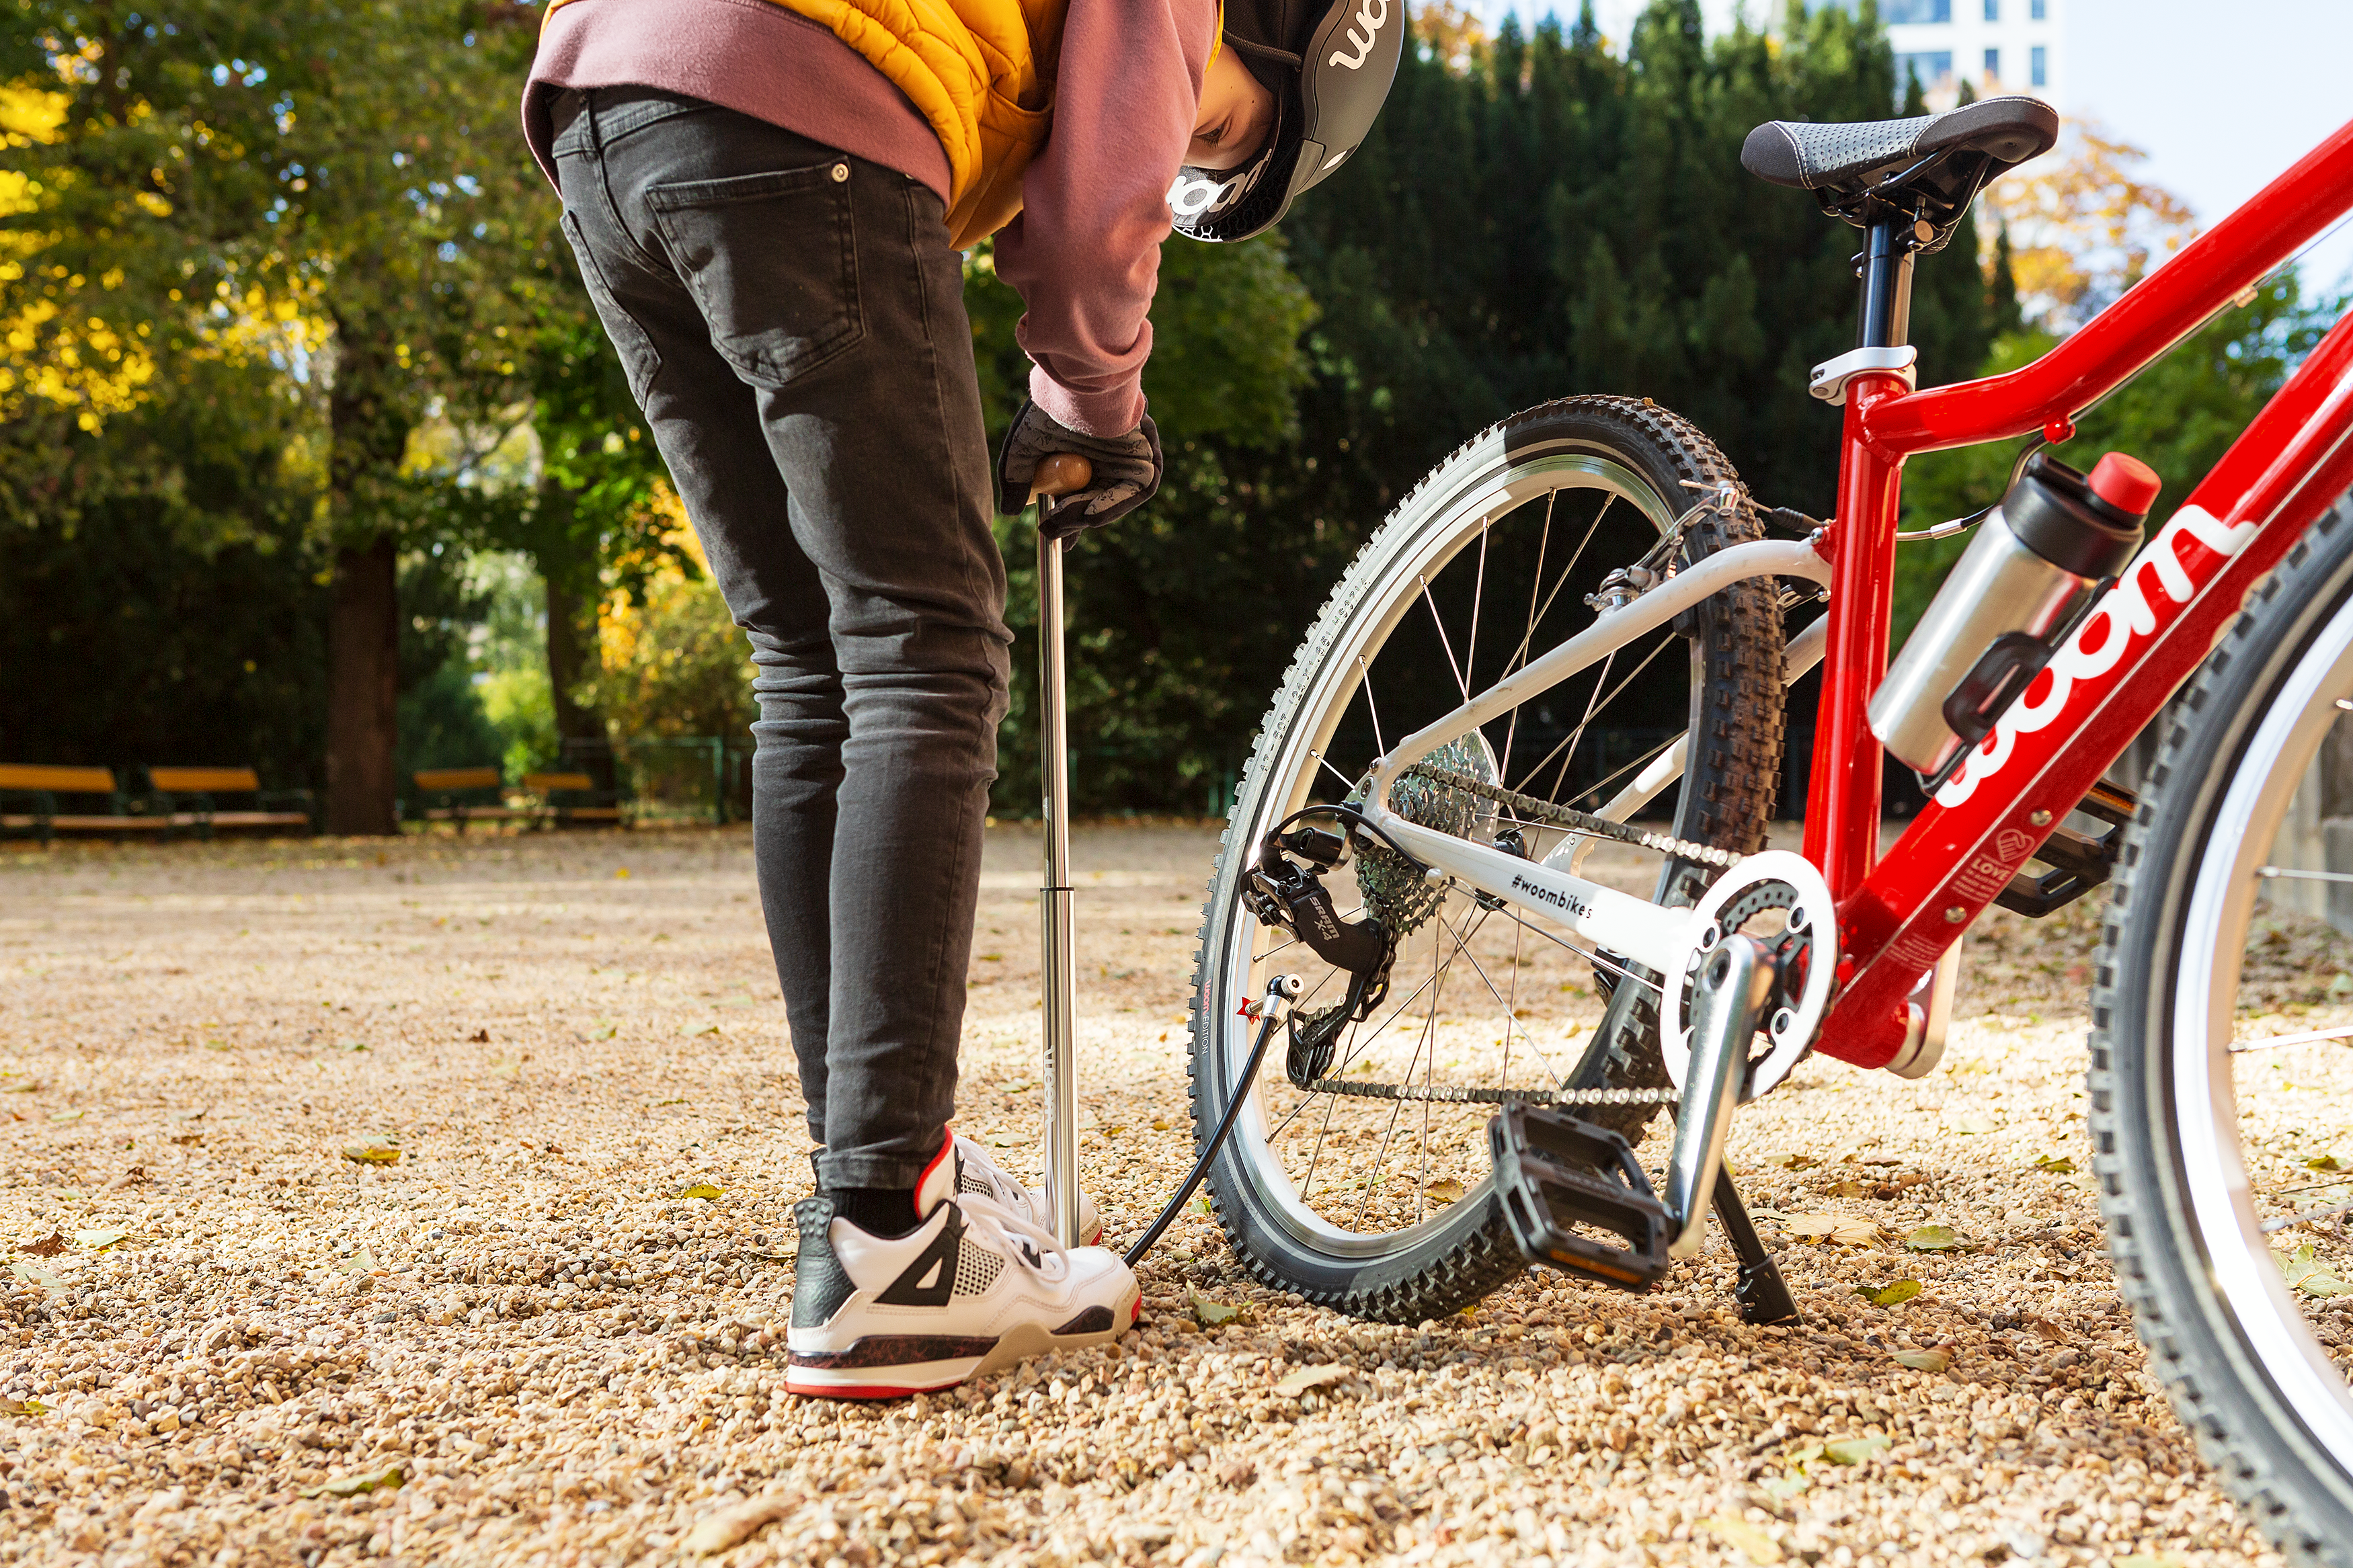
- A is for AIR: Are the tires inflated to the correct pressure? (Check the tire sidewall for recommended PSI).
- B is for BRAKES: Do the brake levers pull smoothly? Do the brake pads engage the wheel rim (or rotor for disc brakes) effectively?
- C is for CHAIN (and Cranks): Is the chain clean and lubricated? Spin the pedals backward; does the chain move freely? Are the crank arms secure?
- D is for DROP TEST (Quick Release): Lift the bike a few inches and gently drop it. Does anything sound loose or rattle? For bikes with quick-release wheels, ensure they are securely closed.


Need more air? Our AIRFLO pump makes pumping up tires easier than ever before.

Tackling Tires: Preventing and Fixing Flats
Getting a flat tire is almost inevitable at some point, but with a bit of prevention, it will hopefully be a rare event. The good news is that most “flat tires” don’t require a new tire – just a new inner tube.
Tips for Preventing Flats Before They Occur
When you’re doing your regular "ABCD" bike tune-up, pay special attention to the tires, both the pressure and the surface of the tire itself.
- Check Tire Condition: Periodically check that your child’s tires aren’t worn out and smooth (a good sign is that there’s ample tread).
- Inspect for Debris: Look for and remove any small pieces of gravel, glass, or thorns stuck in the tire tread.
- Maintain Proper Pressure: Keep a bike pump handy and inflate tires to the proper pressure (found on the tire sidewall) before riding.
- Ride Smart: If you spot broken glass or other sharp debris on the path, instruct your child to avoid riding through that area.
If your tire is flat at the start of a ride, the tube may have a slow leak and need replacement. However, if it’s been a long time since the bike was used, you might just need to reinflate the tires. An easy way to check is to inflate the tire and leave it overnight. If it doesn’t feel softer in the morning, you’re good to go!
What Caused That Flat? Determining the Source
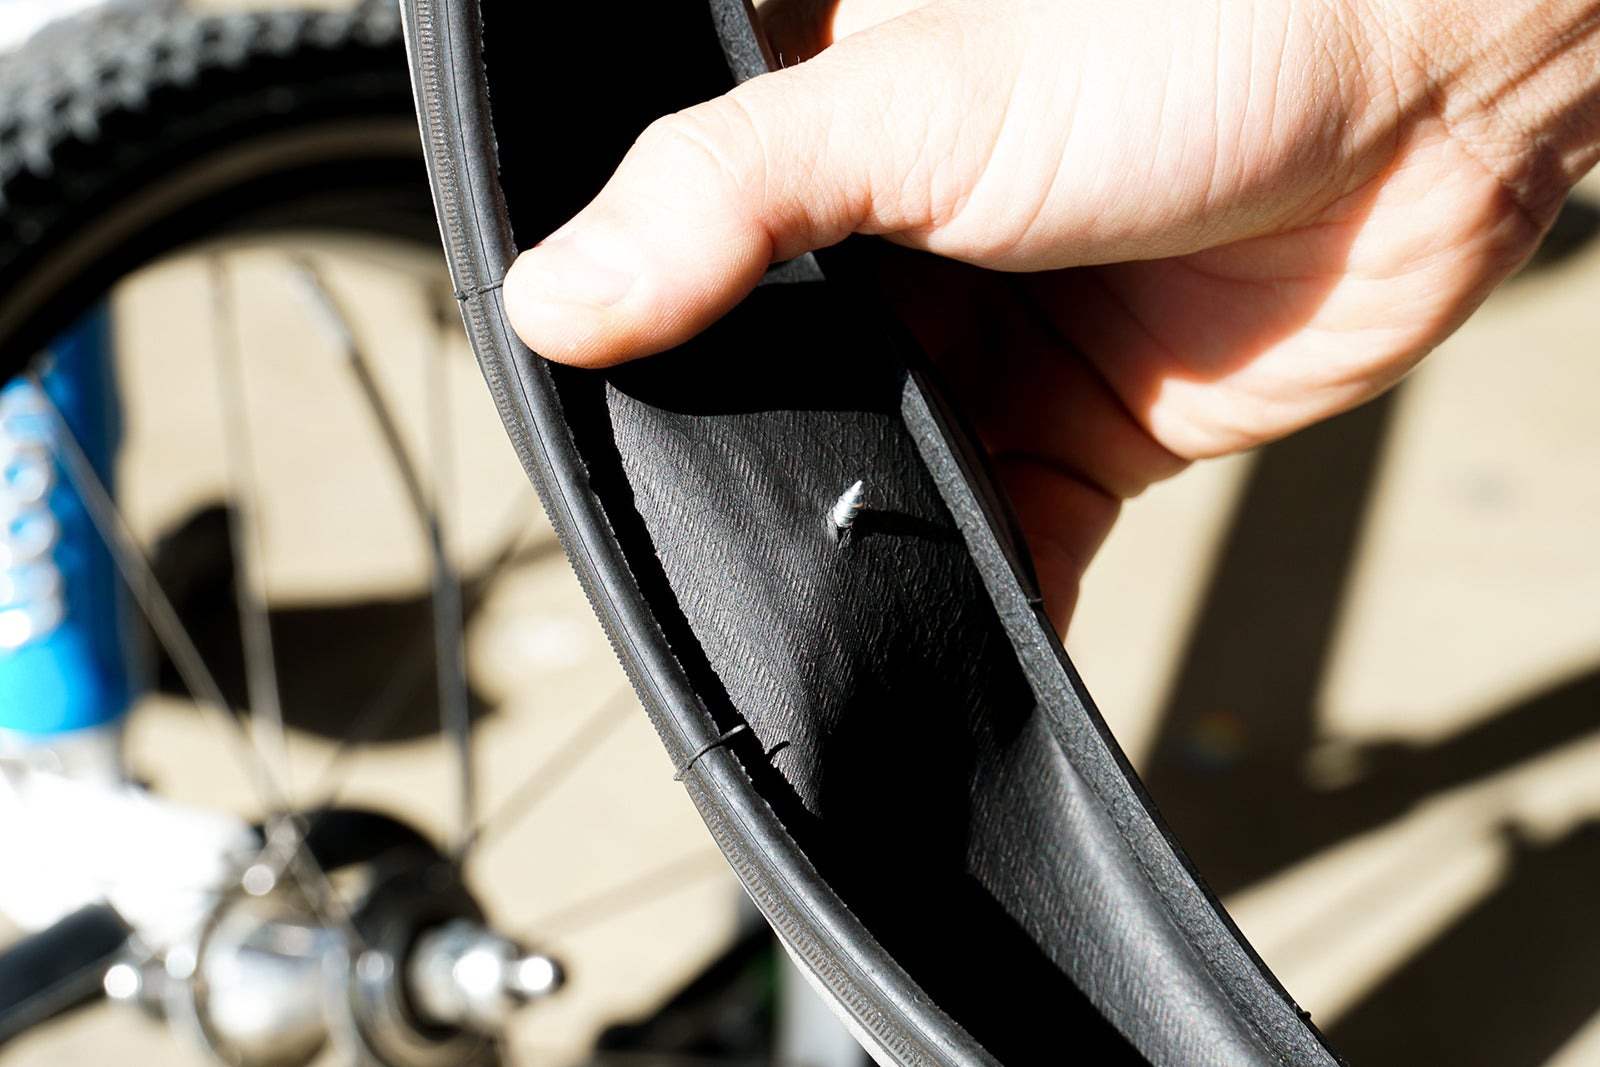
Occasionally, you’ll have the bad luck of running over a nail or sharp object that pokes through the tire and punctures the tube inside. A puncture can cause a tire to slowly go flat or deflate immediately with a loud “whooooosh.” Other times, there’s no sudden noise, just the “thwap thwap thwap” of a flat tire.
When you have a puncture, try to determine what caused the hole. If a small piece of glass is still stuck in the tire, for example, replacing the tube without removing the object will likely result in another flat very quickly. Also, check the tire’s overall condition; if the puncture has caused significant damage to the tire or if the tire's surface is old and worn, it's best to replace both the tire and the tube.
For an in-depth examination of causes, solutions, and preventative measures, check out our blog, “Tires, Tubes, Flats: Everything You Need to Know!”.
Step-by-Step: Replacing a Bike Tube
Knowing how to fix a flat bike tire is a valuable skill. Here’s a basic guide:
- Remove Wheel: First, remove the wheel with the flat tire from the bike.
- Remove Tire: Then, remove one side of the tire (i.e., a tire bead) from the wheel rim using tire levers or your hands.
- Remove Old Tube: Take out the old, punctured tube.
- Inspect: Carefully check the inside of the tire and the rim for any sharp objects or damage that caused the flat. Remove any debris. If it’s hard to tell where the flat occurred, inflate the old flat tube to see where the air is escaping (and then find the same spot on the tire to check).
- Slightly Inflate New Tube: Get a new tube of the appropriate size (tube sizes are labeled by wheel diameter) and inflate it just a little. Putting a small amount of air into it makes fitting it into the tire easier.
- Install New Tube: Lay the new tube inside the tire, starting at the valve stem.
- Reinstall Tire: Work the tire back onto the rim using tire levers or your hands. This can sometimes be tricky with the last section.
- Inflate: Inflate the tire to the recommended pressure.
Getting the last section of the tire bead over the rim can be difficult. Many local bike shops are happy to assist if you get stuck!
For video tutorials on fixing flats and links to replacement products, check out our FAQ page on fixing flats.
Pro Tip: Always Carry a Flat Kit
Many cyclists carry a “flat kit” on their rides. A small saddlebag attaches to the bike’s seat post and typically includes:
- A spare tube
- Tire levers
- A frame pump (or CO2 inflator and cartridge)
Having this dedicated bag “living” on the bike means you can easily change a flat tire wherever it occurs and avoid getting stranded.
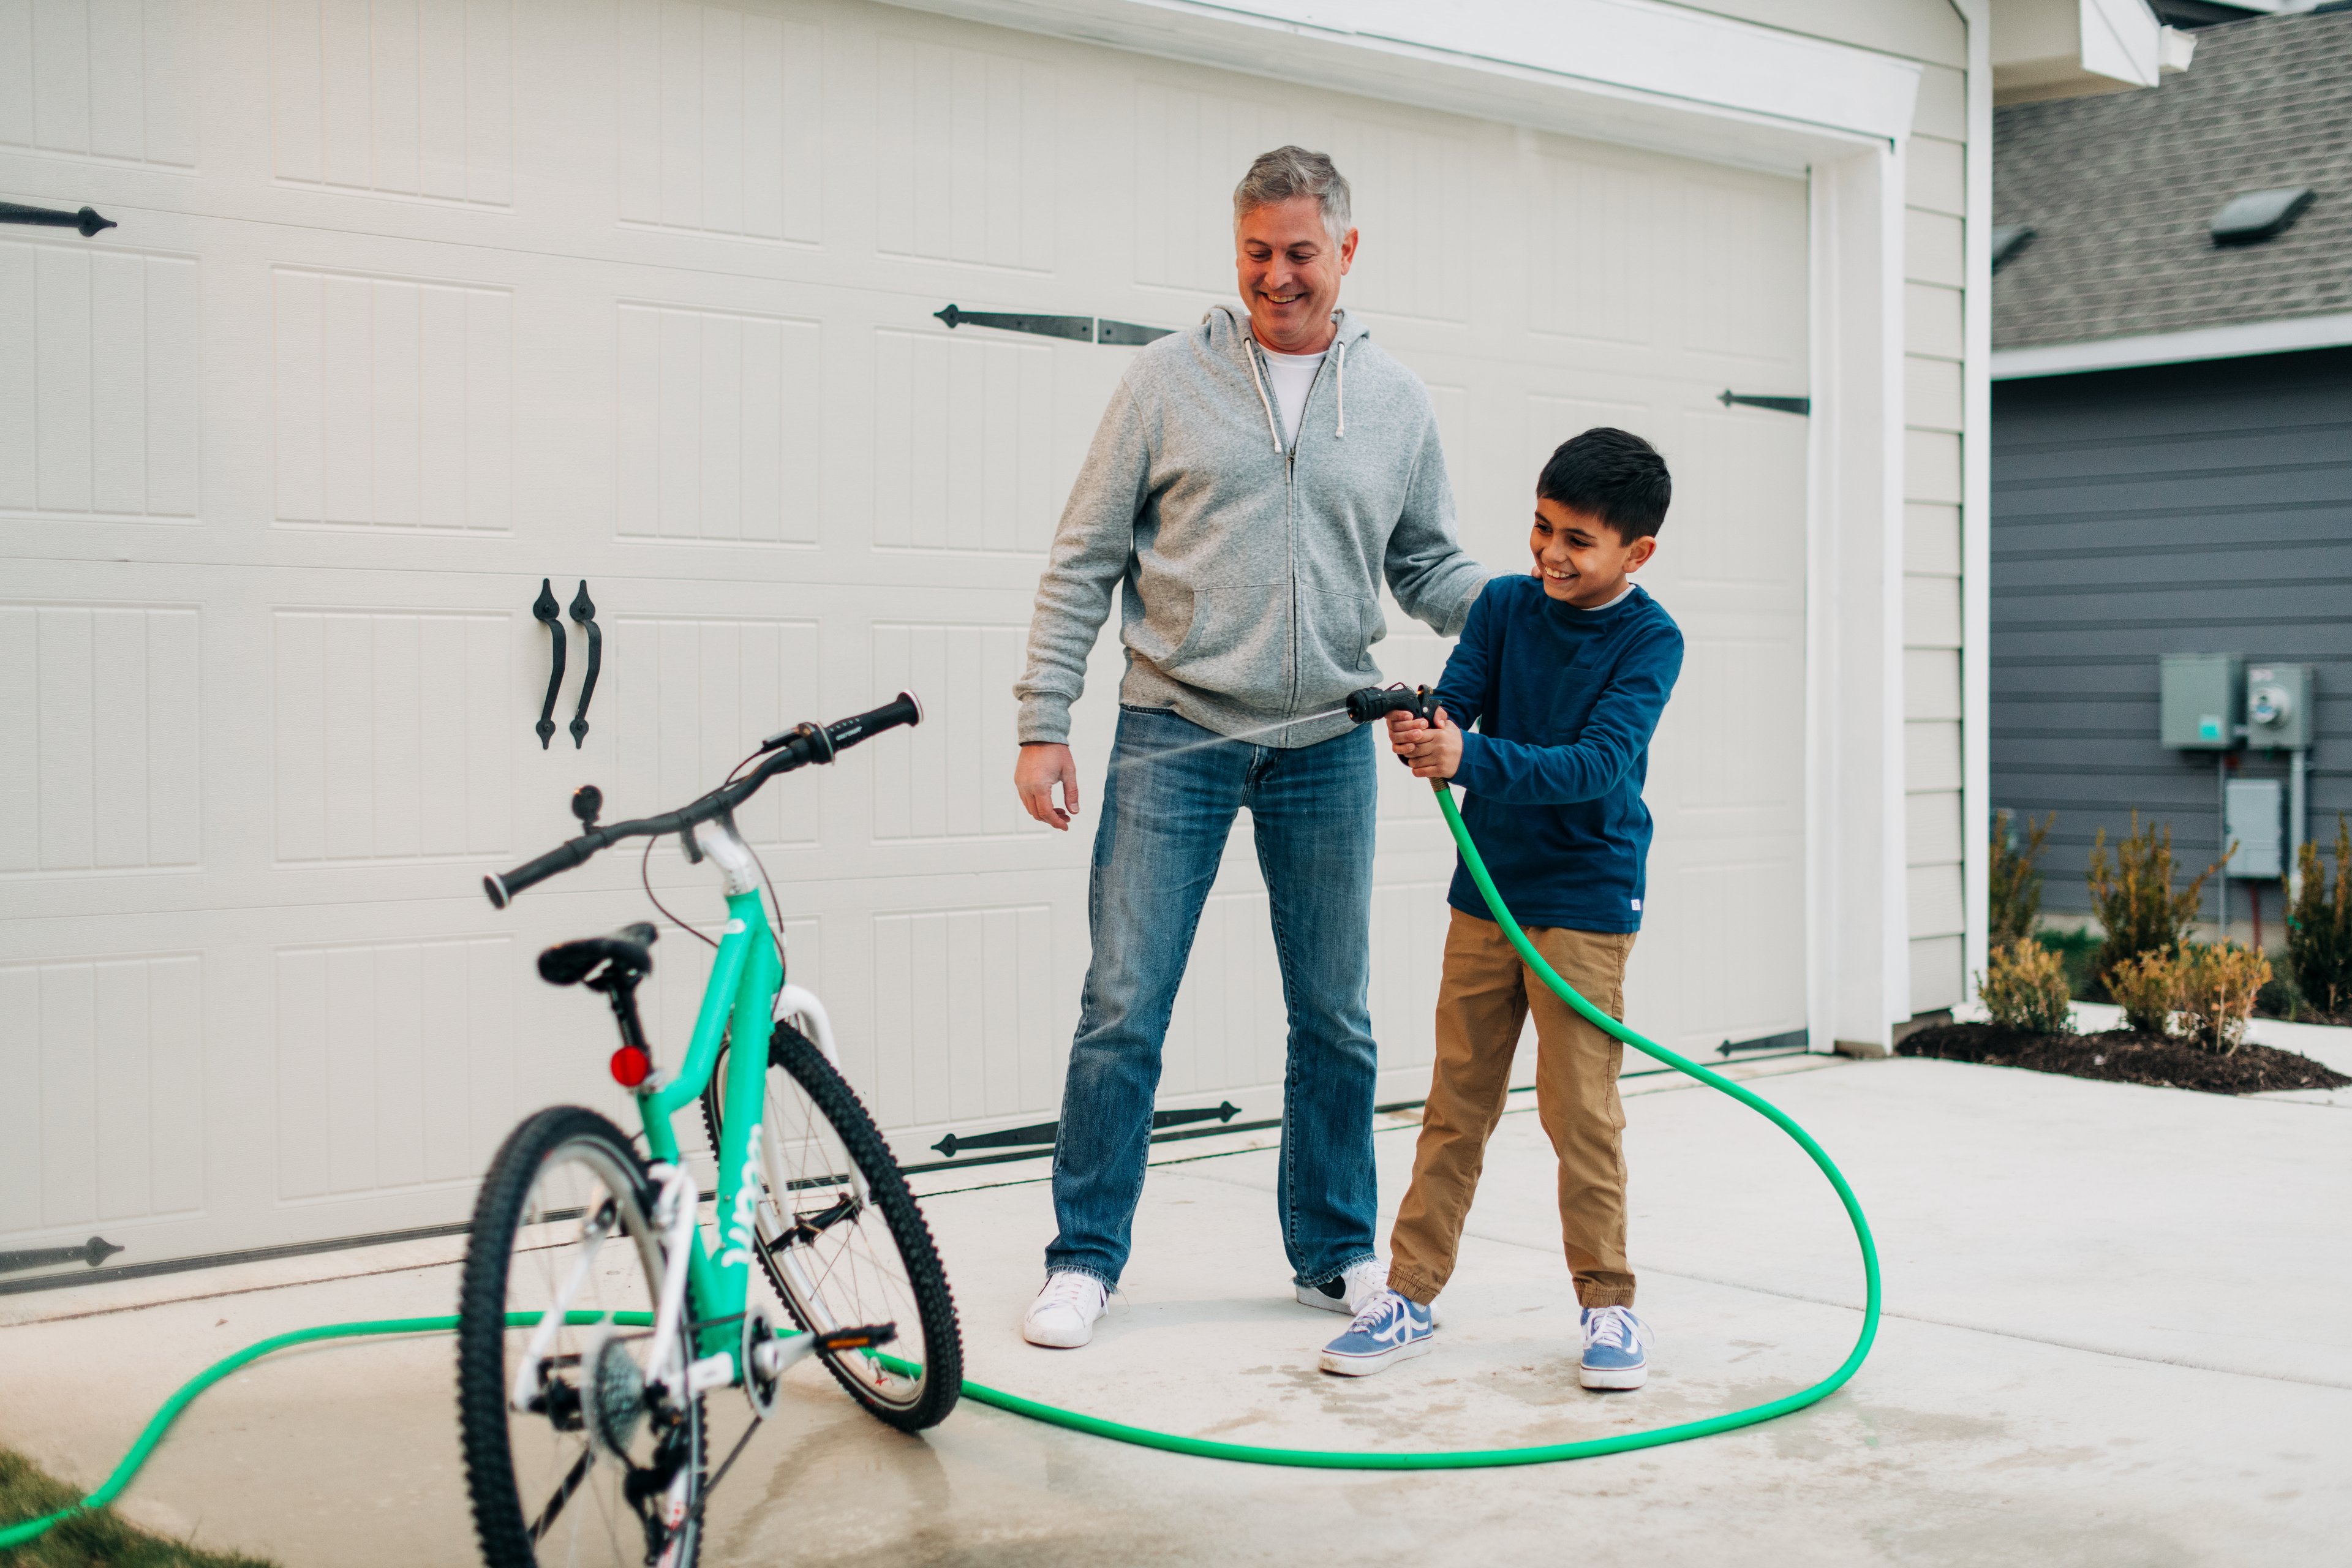
Keeping It Clean: Regular Bike Washing
After your child is set up and riding, we recommend regularly washing their woom bike. A clean bike not only looks great but also helps keep it in good working order and makes its components last much longer.
Check out our “How to Clean Your Bike” article, where we have outlined a simple process that can be used for washing almost any bike – just be sure not to directly spray water with high pressure on bearings or your rear derailleur!
Frequently Asked Questions (FAQs)
A: A quick "ABCD" check (Air, Brakes, Chain, Drop Test) is recommended before every ride. A more thorough check of fit, tire condition, and cleanliness should be done every few months, or if the bike has been in storage.
A: Ensuring correct tire pressure (Air), functional brakes (Brakes), a lubricated chain (Chain), and ensuring that nothing is loose (Drop Test) are critical for safety. Also, regularly check that the bike still fits your growing child correctly (i.e. seatpost height, handlebar positioning, brake adjustments such as reach/tension/lever angle).
A: With a few basic tools (tire levers, pump, spare tube) and a little practice, replacing a tube is a manageable task for most parents. Our guide above and linked videos can help!
A: ABCD stands for Air (tire pressure), Brakes (functionality), Chain (lubrication and condition), and Drop Test (checking for loose parts by gently dropping the bike). It's a quick pre-ride safety check.
A: Use gentle soap, water, and soft brushes or rags. Avoid using high-pressure water directly on bearings (like in the wheels, headset, or bottom bracket) and the derailleur. Our detailed "How to Clean Your Bike" article has more tips.
A: The recommended tire pressure (PSI or BAR) is usually printed on the sidewall of the tires themselves.
At woom, we believe in the magic of riding. Founded by two dads passionate about cycling, we craft ultra-lightweight, high-quality bikes designed specifically for children. Our mission is to make learning to ride easy and fun, ensuring every woom bike grows with your child, creating countless joyful adventures. Learn more about our story and commitment to kid-friendly cycling.